Extending the EmpowerID Components
We provide organizations with the ability to add new attributes to the EmpowerID components. Additionally, you can also add new methods and even override existing ones. After the addition of new attributes and methods, they become accessible in our workflows and user interfaces as genuine component properties. These properties can be edited and updated in a manner similar to the default component properties.
Generally, overriding an existing method is considered easier as compared to adding new methods.
To add a new attribute or method or override existing EmpowerID components involves creating a class library project that contains an edited version of a file called GeneratedComponents.cs for each component you wish to customize. Because this file changes frequently, it is essential to contact EmpowerID to obtain the accurate version for the customization of objects. This ensures that you are working with the most up-to-date file version tailored to your build.
In this lesson, we demonstrate how to add custom attributes to an EmpowerID component by introducing two attributes named DemoCustomAttributeOne and DemoCustomAttributeTwo to the Person component. Additionally, we showcase the process of adding an attribute and methods in the PersonView component:
DemoGetCustomizedPersonView: We will create and utilize this method in a lookup control that will allow us to retrieve the top 10 records from the Person table.
DemoGetCustomPersonByID: We will create and use this method, when provided with a personID, retrieves the related Person object from the Person table.
Whether you want to add a new attribute to your component, add a new method, or override a method, there are some common steps that you need to follow in either case.
- First, create a class library project and name it EIDComponents.
- Copy the GeneratedComponents.cs and OtherComponents.cs classes into your project.
- To add attributes or methods to your component, create classes with exact names matching the component name, in our case, Person.cs and PersonView.cs
- Once you have completed the above steps, build the project using Visual Studio, and it will also publish it.
- Copy the EIDComponents.dll from your project and place it in the GAC. (Not needed for internal developers)
Now, you can use the newly created attributes in your form and methods in your lookup control.
Adding “DemoCustomAttributeOne” and “DemoCustomAttributeTwo” to EmpowerID “Person” Component
Create a new EIDComponents class library.
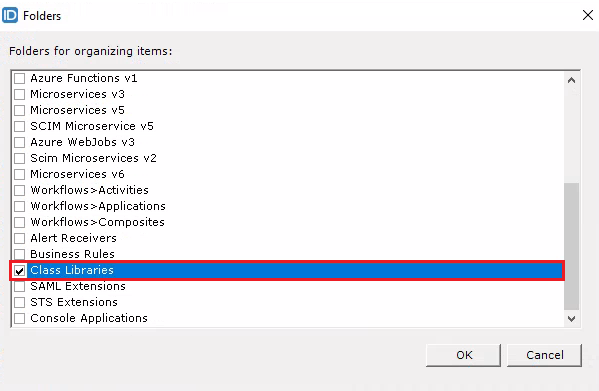
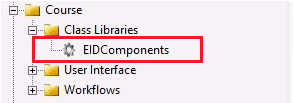
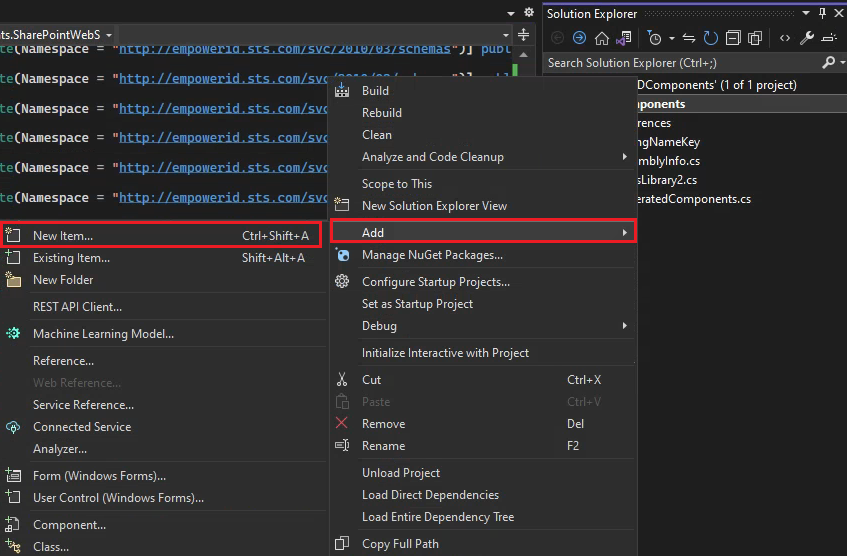
- In Workflow Studio, create a Class Libraries folder under your main folder if it has not been created. To do this, right-click on your main folder, select Add Item Folders, a dialog box will appear named Folders. In the dialog box that appears, select Class Libraries and click OK.

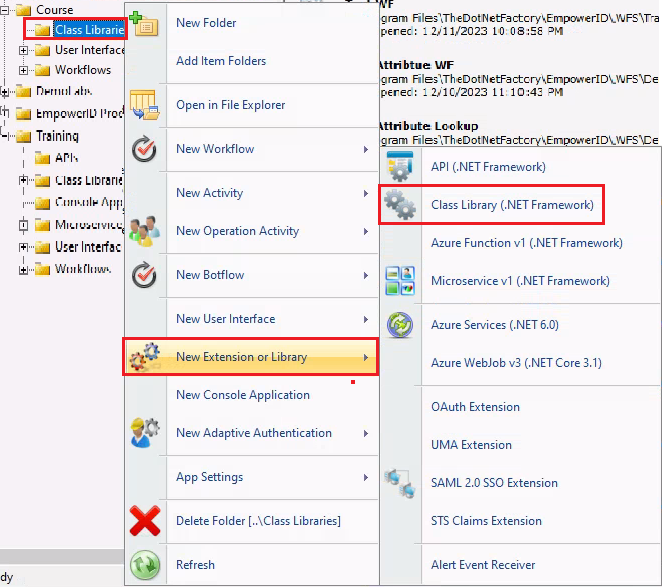
- Right-click on the Class Libraries folder, choose New Extension or Library, and then click on Class Library (.NET Framework).
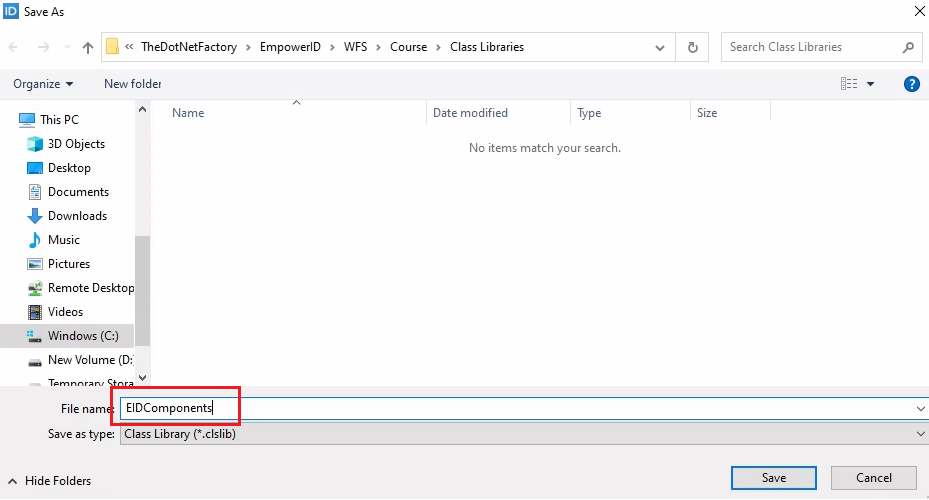
- Click on the save button and give it the name EIDComponents and save it.
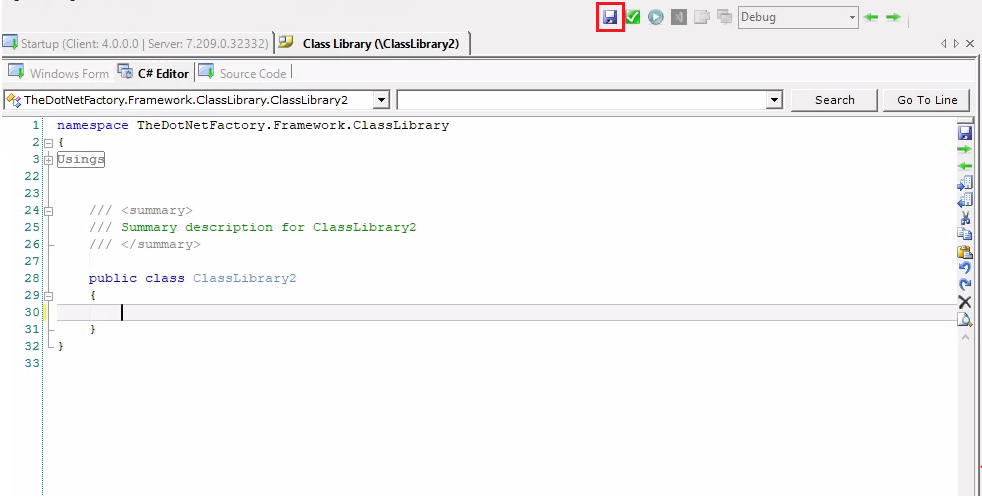
- Once saved then close the window.

We closed the window because we don’t write any code in Workflow Studio. Instead, we will open the class library project in Visual Studio and continue our work from there. To do this, follow the next steps.
- Double-click on the EIDComponents and it will open up in Visual Studio.
 7
7
In order to fulfill our objective for this demonstration, I will create four classes:
-
Person: In this class we will write code to extend the attributes.
-
PersonView: In this class, we will create two methods and an attribute.
-
GeneratedComponents: We will copy the content from the ‘Generated Component’ class provided by EmpowerID. For internal developers, we already have the Generated Component class present. You can copy the content from it and paste it into your class or directly copy the Generated Component class and include it in your project.
-
OtherComponents: We will copy the content from the ‘OtherComponents’ class provided by EmpowerID. For internal developers, we already have the OtherComponents class present. You can copy the content from it and paste it into your class or directly copy the OtherComponents class and include it in your project.
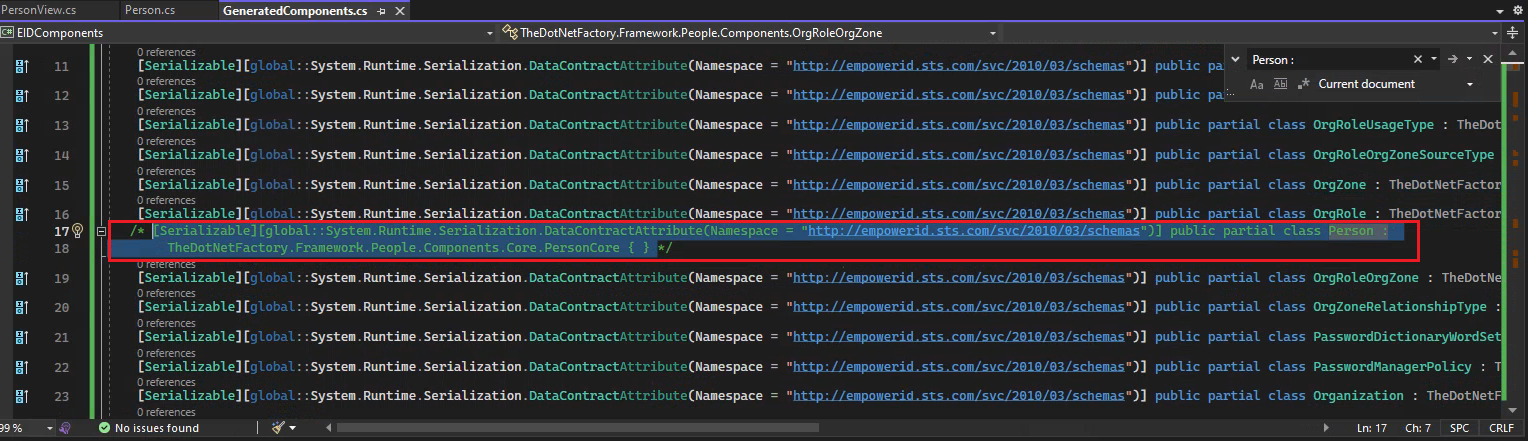
- First create GeneratedComponents class. Delete all the generated code for the GeneratedComponents class.

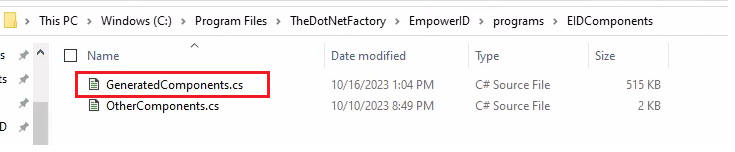
- After creating the class, copy the content from the GeneratedComponent class provided by EmpowerID and paste it into your newly created class. For internal developers, you can find the GeneratedComponent class at the following path. Within this path, you will see two files, GeneratedComponents.cs and OtherComponents.cs. Open the GeneratedComponent.cs file, copy its content, and paste it into your own GeneratedComponent class within our project.
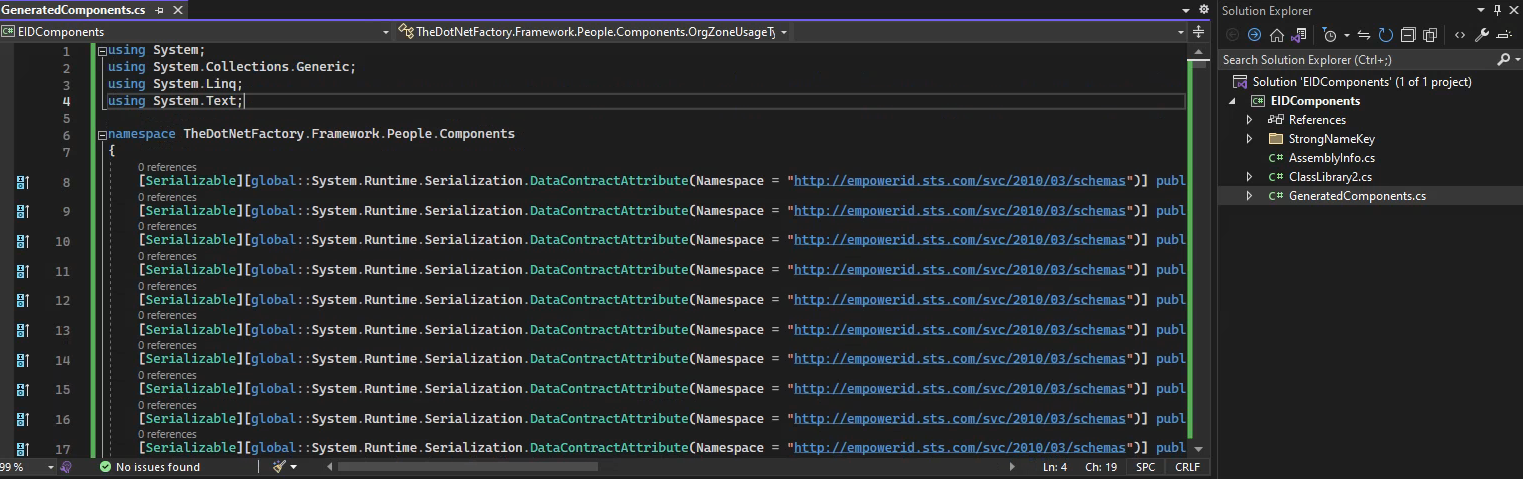
In GeneratedComponent.cs we can see all the classes that are in EmpowerID.
-
Now, create the OtherComponents class and repeat the same steps that we followed for the GeneratedComponent class.
-
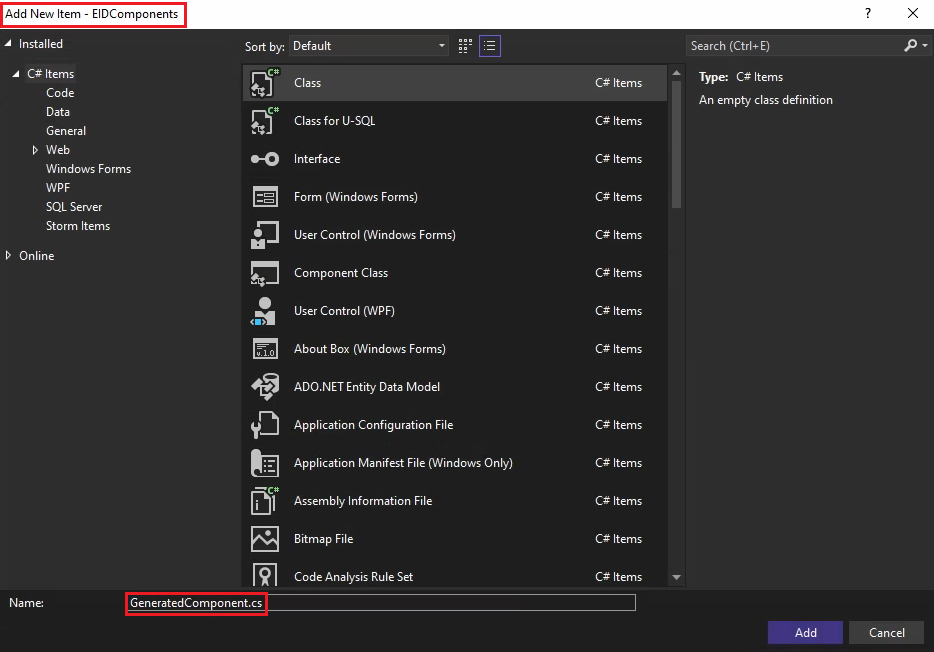
It's time to create the Person and PersonView classes. Right-click on your project, navigate to Add, and click on New Item. Type Person, then click on the Add button. Repeat the same process to create the PersonView class.

-
Go to the GeneratedComponent class search for the Person class, copy it and then comment it out. Save your changes by clicking on the save button or Ctrl + S.
-
Now go to your Person class highlight the code of “internal class Person” and replace it with the code we copied.

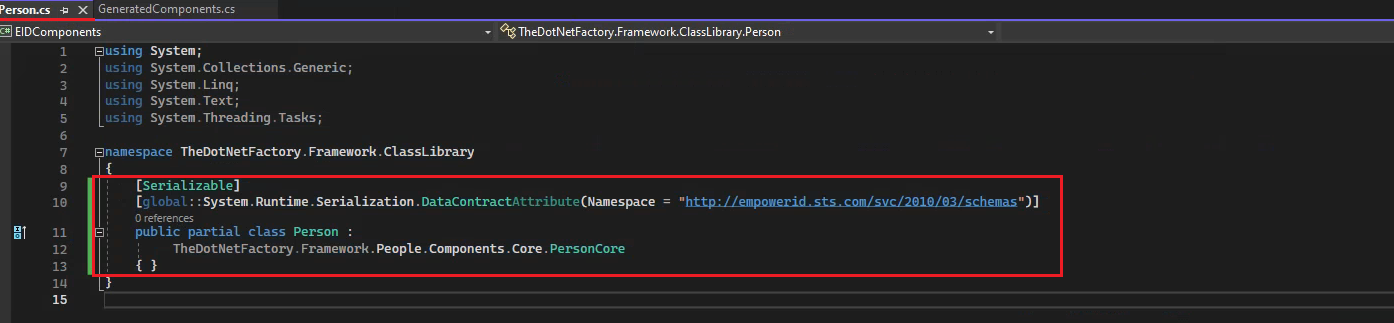
We write code to inherit Person class from the base PersonCore objects. This makes all the properties and methods of the default Person objects available to our customized components.
-
Change the namespace from TheDotNetFactory.Framework.ClassLibrary to namespace TheDotNetFactory.Framework.People.Components

-
Add the following Using statement in your Person class.
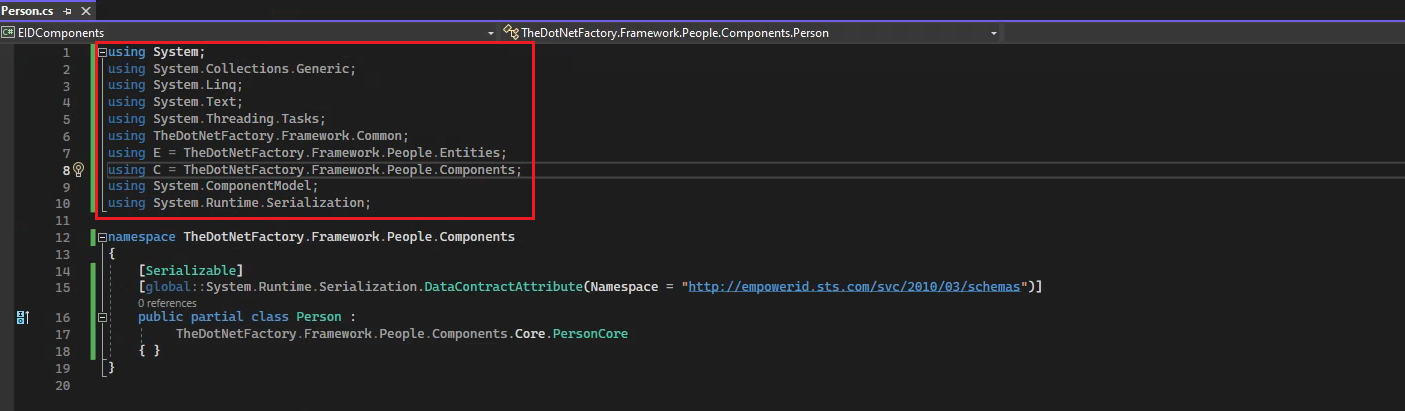
using System;
using System.Collections.Generic;
using System.Linq;
using System.Text;
using System.Threading.Tasks;
using TheDotNetFactory.Framework.Common;
using E = TheDotNetFactory.Framework.People.Entities;
using C = TheDotNetFactory.Framework.People.Components;
using System.ComponentModel;
using System.Runtime.Serialization;
-
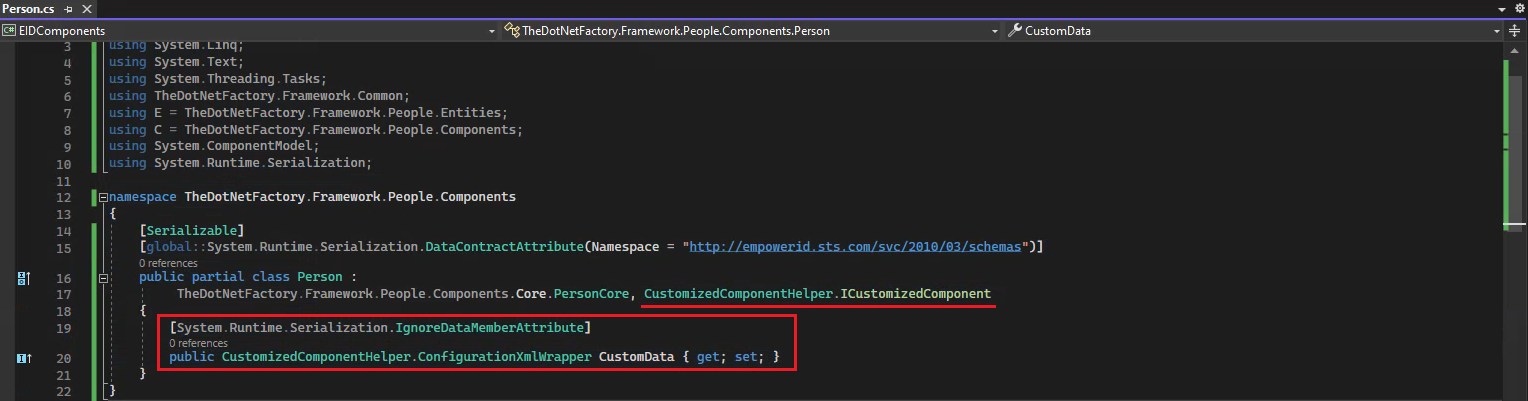
Inherit your class with CustomizedComponentHelper.ICustomizedComponent.
-
Create CustomData property.
[System.Runtime.Serialization.IgnoreDataMemberAttribute]
 public CustomizedComponentHelper.ConfigurationXmlWrapper CustomData { get; set; }
We implement the CustomizedComponentHelper.ICustomizedComponent interface. This interface requires us to add a public property named CustomData of type CustomizedComponentHelper.ICustomizedComponent, which is a helper variable used for storing custom information.
We decorated CustomData property with a [System.Runtime.Serialization.IgnoreDataMemberAttribute]. When applied to a property or field, it instructs the serializer to exclude that particular member from the serialization process. In other words, it tells the runtime not to consider that specific data member when converting an object into a format suitable for storage or transmission, and vice versa during deserialization.
- Add the code for our first attribute DemoCustomAttributeOne.
    [CreateRbacProperty]
        [TheDotNetFactory.Framework.People.Components.Serialization.CustomPropertySerializationAttribute]
        public string DemoCustomAttributeOne
        {
            get
            {
                return C.CustomizedComponentHelper.GetExtendedAttribValue<string>(this, "Person", "DemoCustomAttributeOne", false);
            }
            set
            {
                C.CustomizedComponentHelper.SetExtendedAttribValue<string>(this, "Person", "DemoCustomAttributeOne", value, false);
            }
        }
These decorators instruct EmpowerID to make any decorated properties (primitives only) available to forms, lookups, reports and Web pages once the class library project is compiled and published to the Identity Warehouse.
- Add the Code for our second attribute DemoCustomAttributeTwo
        [CreateRbacProperty]
        [DataMember]
        public string DemoCustomAttributeTwo
        {
            get
            {
                return C.CustomizedComponentHelper.GetExtendedAttribValue<string>(this, "Person", "DemoCustomAttributeTwo", true);
            }
            set
            {
                C.CustomizedComponentHelper.SetExtendedAttribValue<string>(this, "Person", "DemoCustomAttributeTwo", value, true);
            }
        }
Below is the complete code we have written so far in our Person class.
using System;
using System.Collections.Generic;
using System.Linq;
using System.Text;
using System.Threading.Tasks;
using TheDotNetFactory.Framework.Common;
using E = TheDotNetFactory.Framework.People.Entities;
using C = TheDotNetFactory.Framework.People.Components;
using System.ComponentModel;
using System.Runtime.Serialization;

namespace TheDotNetFactory.Framework.People.Components
{
    [Serializable]
    [global::System.Runtime.Serialization.DataContractAttribute(Namespace = "http://empowerid.sts.com/svc/2010/03/schemas")]
    public partial class Person :
         TheDotNetFactory.Framework.People.Components.Core.PersonCore, CustomizedComponentHelper.ICustomizedComponent
    {
        [System.Runtime.Serialization.IgnoreDataMemberAttribute]
        public CustomizedComponentHelper.ConfigurationXmlWrapper CustomData { get; set; }

        [CreateRbacProperty]
        [TheDotNetFactory.Framework.People.Components.Serialization.CustomPropertySerializationAttribute]
        public string DemoCustomAttributeOne
        {
            get
            {
                return C.CustomizedComponentHelper.GetExtendedAttribValue<string>(this, "Person", "DemoCustomAttributeOne", false);
            }
            set
            {
                C.CustomizedComponentHelper.SetExtendedAttribValue<string>(this, "Person", "DemoCustomAttributeOne", value, false);
            }
        }
        [CreateRbacProperty]
        [DataMember]
        public string DemoCustomAttributeTwo
        {
            get
            {
                return C.CustomizedComponentHelper.GetExtendedAttribValue<string>(this, "Person", "DemoCustomAttributeTwo", true);
            }
            set
            {
                C.CustomizedComponentHelper.SetExtendedAttribValue<string>(this, "Person", "DemoCustomAttributeTwo", value, true);
            }
        }
    }
}
[CreateRbacProperty] decorator determines the creation of a record in the EmpowerID RBACObjectAttribute table, making the attribute available in the UI or API. You can also add it to an existing operation, allowing the existing operation to use or modify it. In simple words we can say we use the [CreateRbacProperty] decorator so that this property can be dragged and dropped onto the form; otherwise, this property will not be available.
[TheDotNetFactory.Framework.People.Components.Serialization.CustomPropertySerializationAttribute] decorator simply saying that this is going to be a custom attribute.
GetExtendedAttribValue and SetExtendedAttribValue are simply putting the data in XML and retrieving the data from the XML behind the scenes.
We don’t allow you to change the schema of the Person table, but we do allow you to add an additional schema. There is a column called ConfigurationXML where you can add additional schema and make it strongly typed. This way, you can access it like Person.NewColumnName. So, in our case whatever values we will put in DemoCustomAttributeOne and DemoCustomAttributeTwo will get stored in the ConfigurationXML column of the Person table.
The extended attributes that are added in the ConfigurationXML column of any component can be displayed in the UI and can also be updated. However, if there is a need to use these attributes/columns in any stored procedure or in WHERE clauses, we recommend using the CustomAttributes columns, as they are available in the tables of every component.
Adding “DemoCustomAttributeTwo,” “GetCustomTopTenPerson,” and “GetCustomPersonByID” methods to the EmpowerID “PersonView” component.
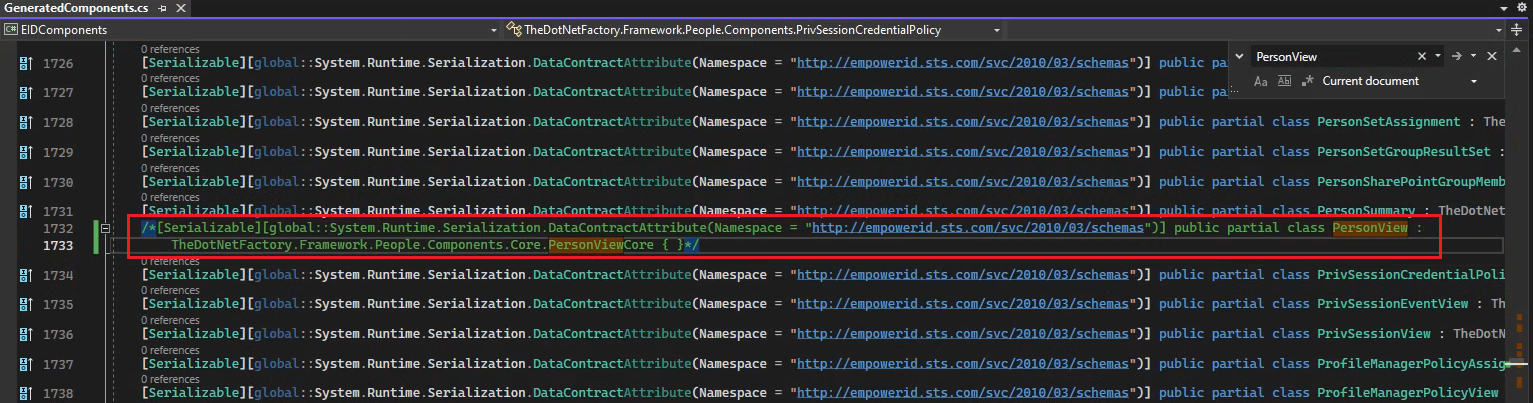
- Go to the GeneratedComponent class, search for the PersonView class, copy it, and comment it out. Save your changes by clicking on the save button or Ctrl + S.
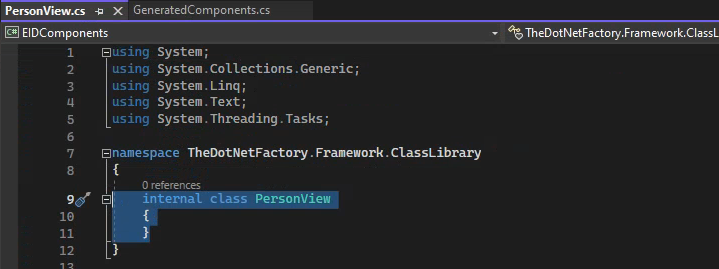
- Now go to your PersonView class highlight the code of “internal class PersonView” and replace it with the code we copied.
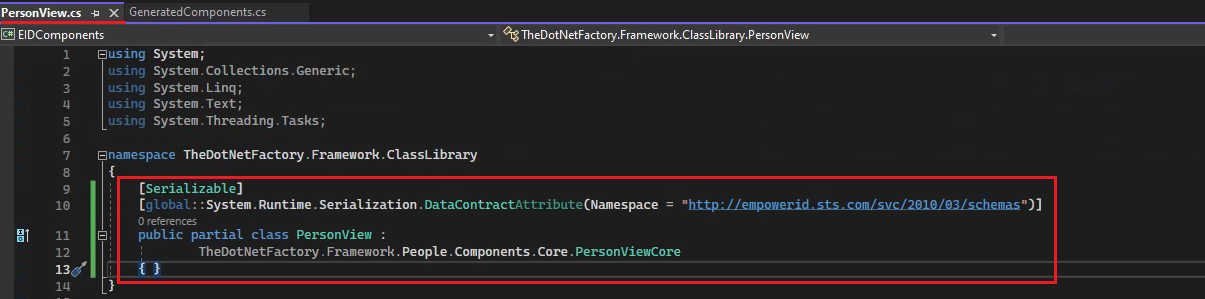
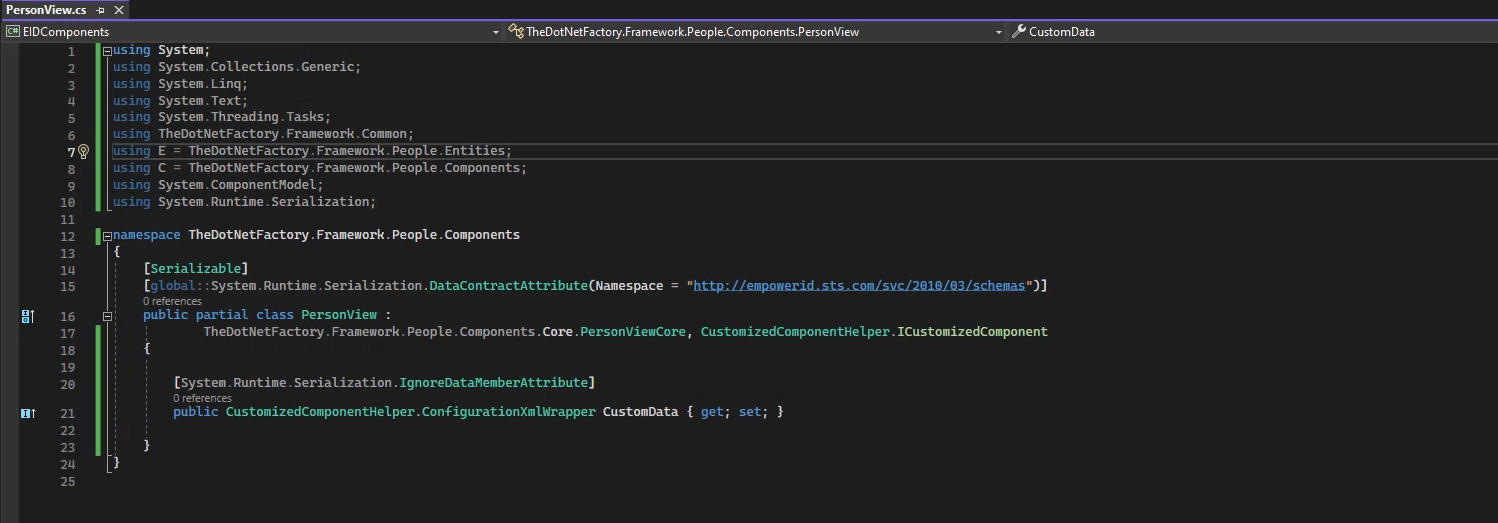
- Change the namespace from TheDotNetFactory.Framework.ClassLibrary to namespace TheDotNetFactory.Framework.People.Components
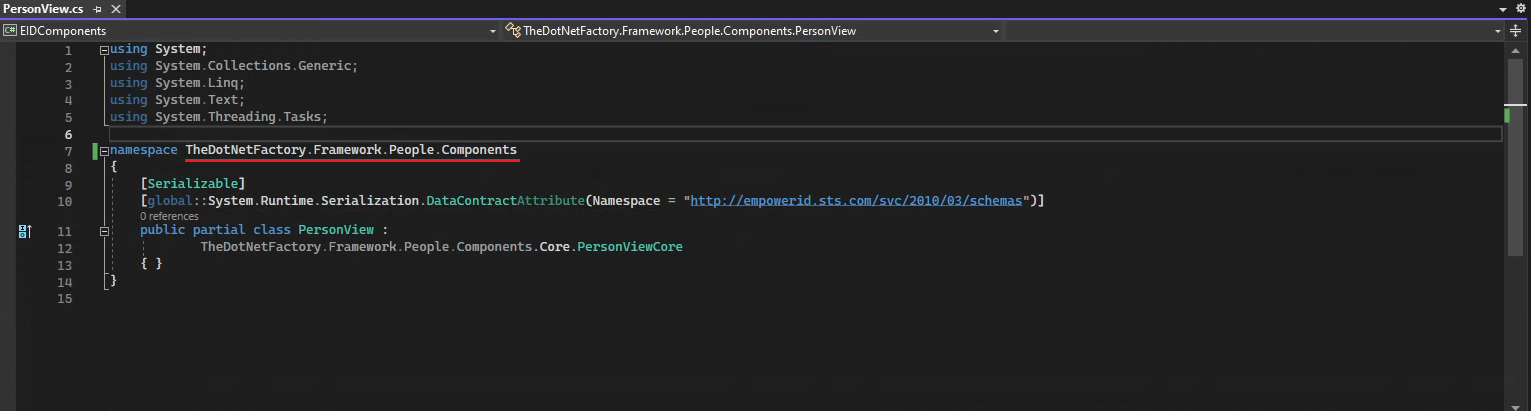
- Add the following Using statement in your PersonView class.
using System;
using System.Collections.Generic;
using System.Linq;
using System.Text;
using System.Threading.Tasks;
using TheDotNetFactory.Framework.Common;
using E = TheDotNetFactory.Framework.People.Entities;
using C = TheDotNetFactory.Framework.People.Components;
using System.ComponentModel;
using System.Runtime.Serialization;
-
Inherit your class with CustomizedComponentHelper.ICustomizedComponent
-
Create CustomData property and decorate it with [System.Runtime.Serialization.IgnoreDataMemberAttribute]
- Create a method DemoGetCustomizedPersonView
[DataObjectMethod(DataObjectMethodType.Select)]
public static E.VList<C.PersonView> DemoGetCustomizedPersonView()
{
  return PersonView.GetVList("Demo_PersonView_GetCustomizedPerson", new object[] {});
}
- Create a method DemoGetCustomPersonByID.
[DataObjectMethod(DataObjectMethodType.Select)]
public static E.VList<C.PersonView> DemoGetCustomPersonByID(int personID)
{
  return PersonView.GetVList("Demo_PersonView_GetPersonByID", new object[] { personID });
}
- Create an attribute DemoCustomAttributeTwo in PersonView class.
        [CreateRbacProperty]
        [DataMember]
        public string DemoCustomAttributeTwo
        {
            get
            {
                return C.CustomizedComponentHelper.GetExtendedAttribValue<string>(this, "Person", "DemoCustomAttributeTwo", true);
            }
            set
            {
                C.CustomizedComponentHelper.SetExtendedAttribValue<string>(this, "Person", "DemoCustomAttributeTwo", value, true);
            }
        }
Below is the complete code we have written so far in our PersonView class.
using System;
using System.Collections.Generic;
using System.Linq;
using System.Text;
using System.Threading.Tasks;
using TheDotNetFactory.Framework.Common;
using E = TheDotNetFactory.Framework.People.Entities;
using C = TheDotNetFactory.Framework.People.Components;
using System.ComponentModel;
using System.Runtime.Serialization;

namespace TheDotNetFactory.Framework.People.Components
{
    [Serializable]
    [global::System.Runtime.Serialization.DataContractAttribute(Namespace = "http://empowerid.sts.com/svc/2010/03/schemas")]
    public partial class PersonView :
            TheDotNetFactory.Framework.People.Components.Core.PersonViewCore, CustomizedComponentHelper.ICustomizedComponent
    {

        [System.Runtime.Serialization.IgnoreDataMemberAttribute]
        public CustomizedComponentHelper.ConfigurationXmlWrapper CustomData { get; set; }

        [DataObjectMethod(DataObjectMethodType.Select)]
        public static E.VList<C.PersonView> DemoGetCustomizedPersonView()
        {
            return C.PersonView.GetVList("Demo_PersonView_GetCustomizedPerson", new object[] {});
        }


        [DataObjectMethod(DataObjectMethodType.Select)]
        public static E.VList<C.PersonView> DemoGetCustomPersonByID(int personID)
        {
            return PersonView.GetVList("Demo_PersonView_GetPersonByID", new object[] { personID });
        }

        [CreateRbacProperty]
        [DataMember]
        public string DemoCustomAttributeTwo
        {
            get
            {
                return C.CustomizedComponentHelper.GetExtendedAttribValue<string>(this, "Person", "DemoCustomAttributeTwo", true);
            }
            set
            {
                C.CustomizedComponentHelper.SetExtendedAttribValue<string>(this, "Person", "DemoCustomAttributeTwo", value, true);
            }

        }
    }
}
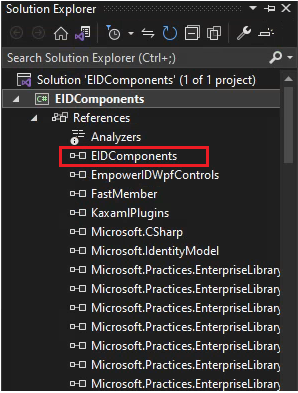
- Remove EIDComponents.dll from the References
Create two Stored Procedure Demo_PersonView_GetCustomizedPerson and Demo_PersonView_GetPersonByID
Create proc dbo.Demo_PersonView_GetCustomizedPerson
AS
BEGIN
  select top 10 * from PersonView;
END
Create proc dbo.Demo_PersonView_GetPersonByID

@PID INT

AS
BEGIN
  select * from PersonView where PersonID = @PID;
END
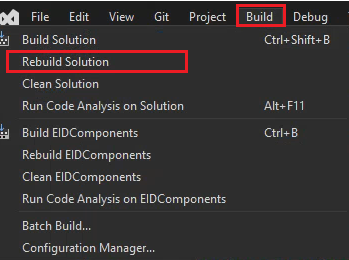
- Now, from Visual Studio, publish your project by navigating to the Build menu and selecting the Rebuild Solution option. The system will authenticate through the browser and proceed to publish your project.

Now, we will learn how to place the EIDComponents.dll in the GAC so that it is available for all projects. However, internal developers at EmpowerID do not need to place this DLL in the GAC; your changes will automatically reflect.
Steps to put the DLL in GAC
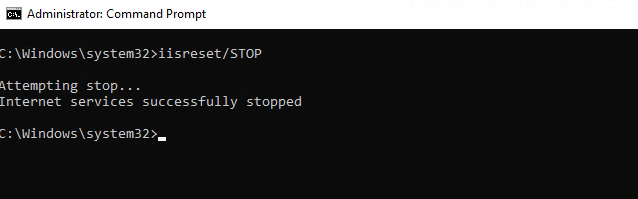
- Stop the EmpowerID Web Role and EmpowerID Worker Role services by accessing the Task Manager and navigating to the Services tab.

- Stop the IIS
-
Close the Visual Studio and Workflow Studio.
-
Copy the EIDComponents.dll from the specified path and paste it into the GAC. Alternatively, you can copy the entire EIDComponents folder and place it in the GAC.


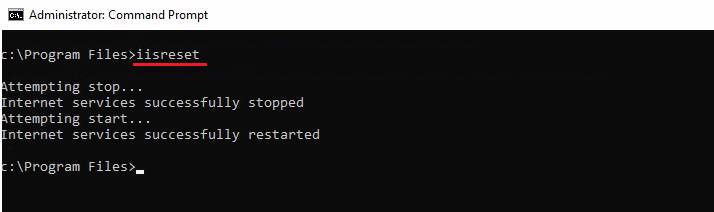
- Restart the IIS
- After putting the EIDComponents folder in the GAC and restarting the IIS. Run RbacObjectDatabaseUtility.exe
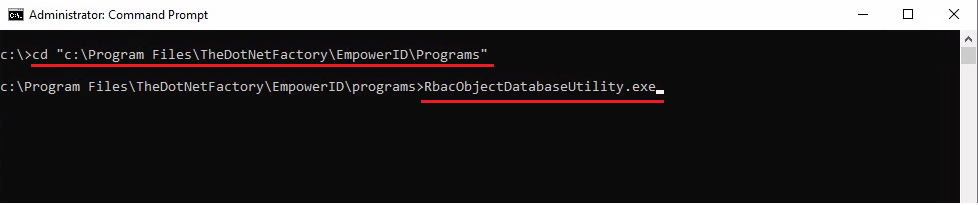
- Type ALL

RbacObjectDatabaseUtility: This utility scans EID Components for any new attributes and methods, then adds them to our database. It is the part of continuous integration.
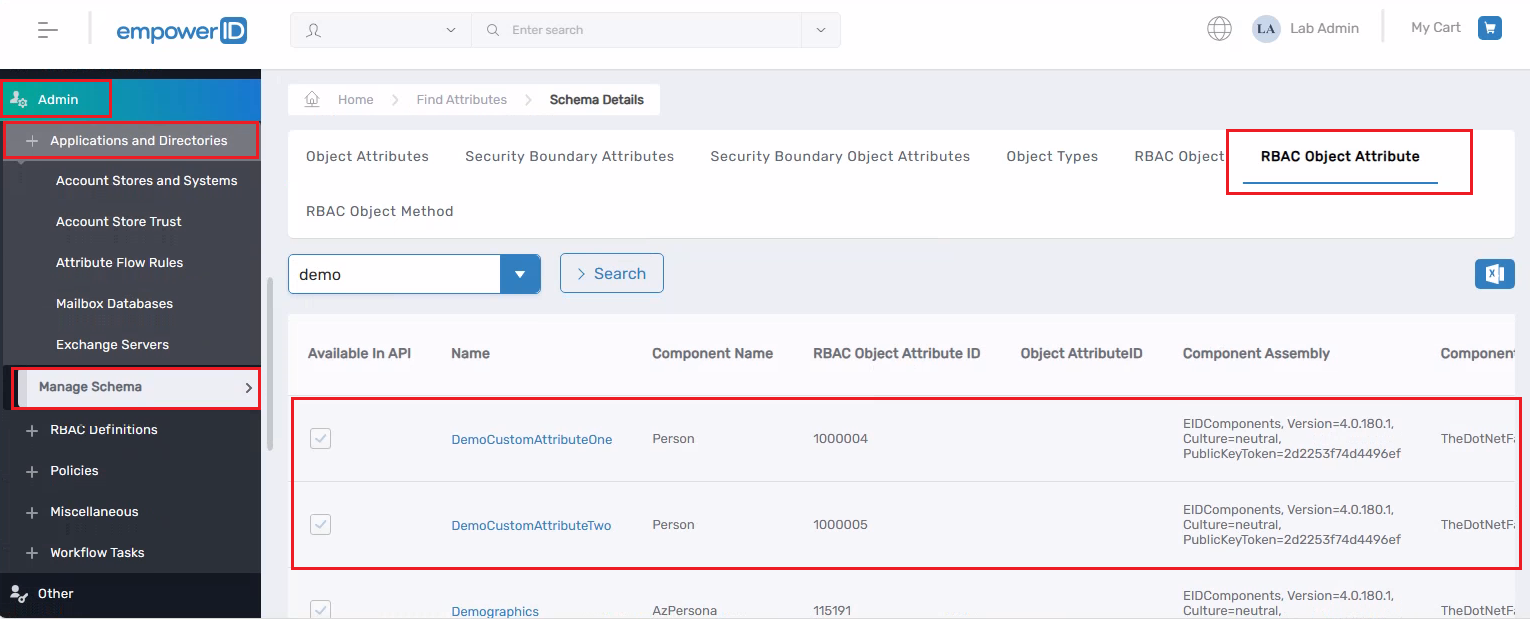
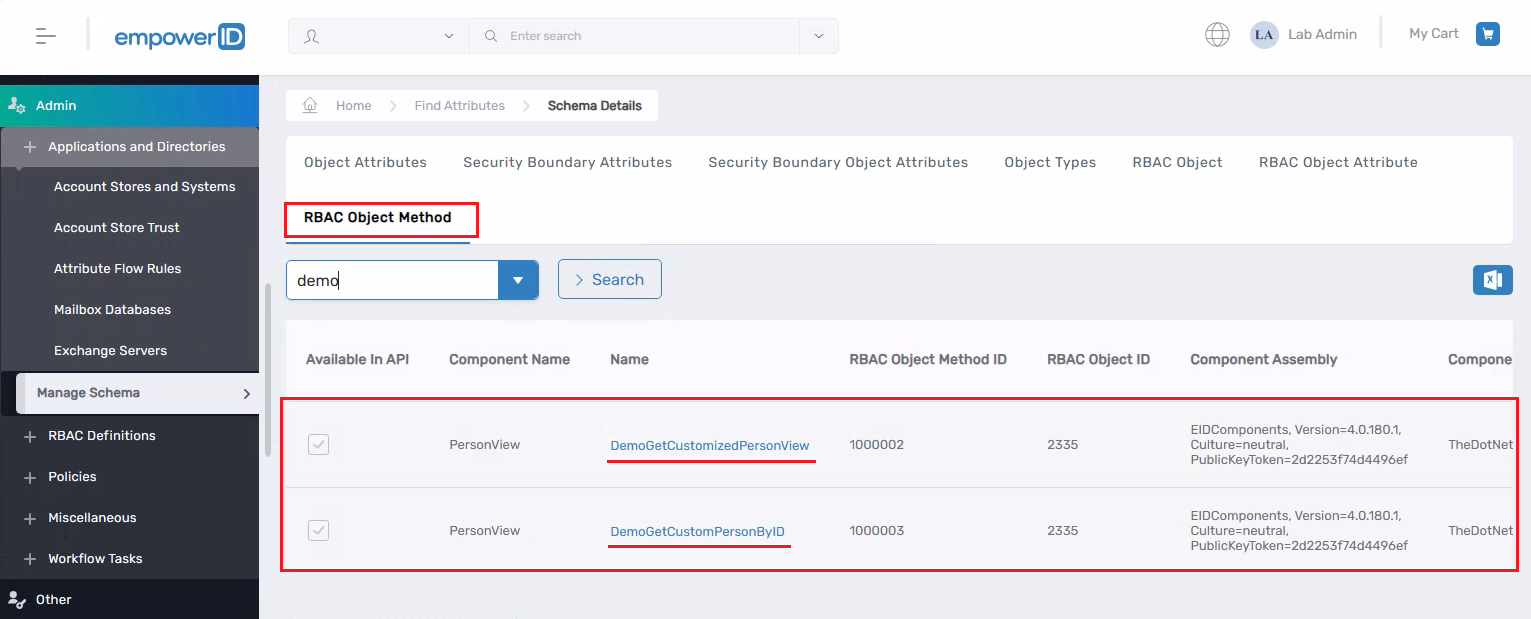
- Navigate to the EmpowerID Web UI. From the left navigation, go to Admin → Applications and Directories → Manage Schema. Click on the RBAC Object Attribute tab, and in the search box, type demo. You will be able to see the two attributes that you have created in the Person component.
- Click on the RBAC Object Method tab, and in the search box, type demo. You will be able to see the names of the methods you have created in the PersonView component.
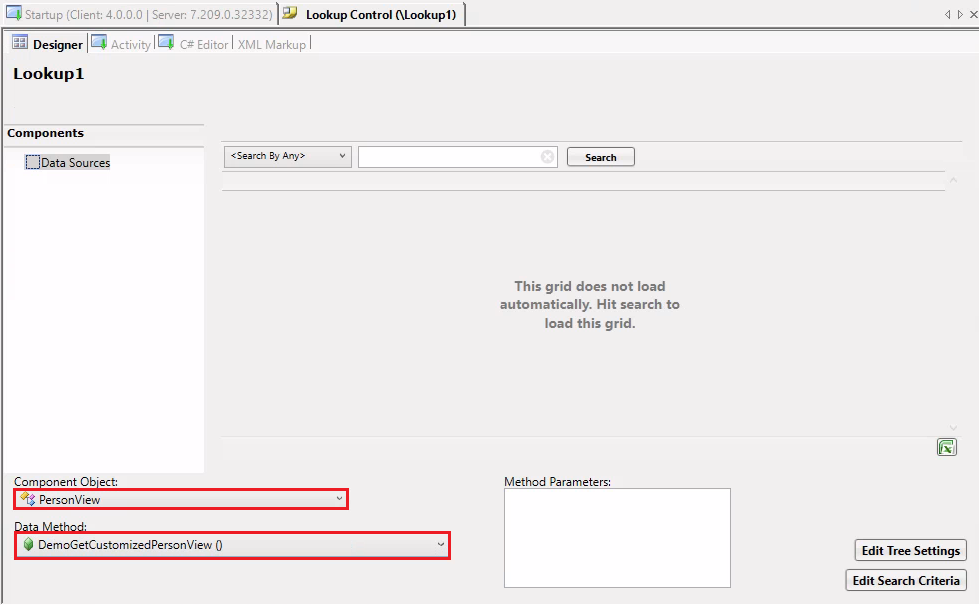
Create a Lookup Control to verify the availability of our attribute and methods in the 'PersonView' component.
- Create a lookup control, and from the Component Object, select PersonView. In the Data Method dropdown, search for the methods we have created. You will be able to see those methods, select any one of them and use it in your lookup control. (Refer to the documentation for the Lookup Control)

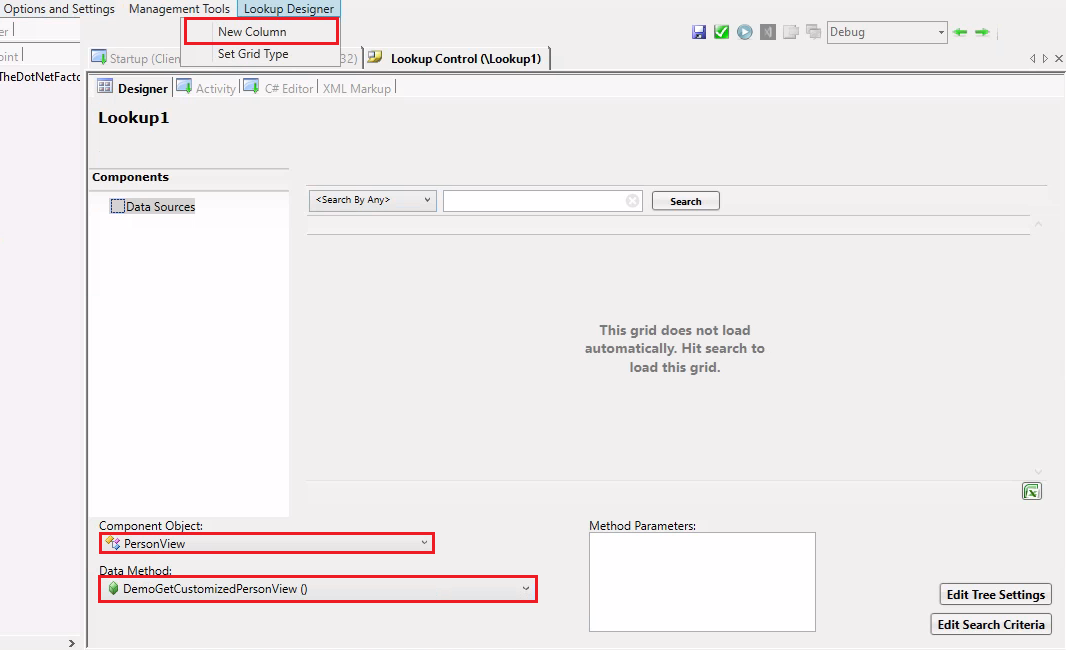
- Keep PersonView and DemoGetCustomizedPersonView() selected in the dropdowns. Navigate to the Lookup Designer menu and choose the New Column option.
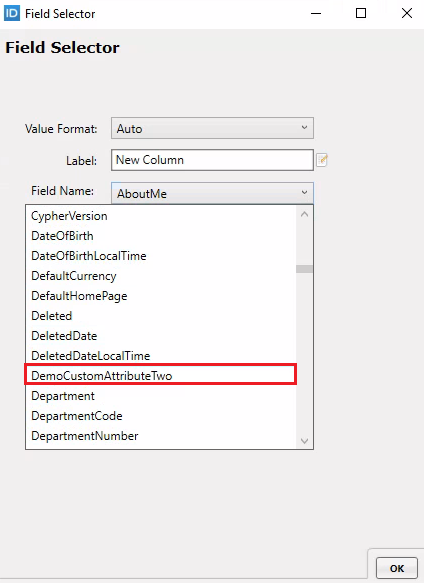
- Click on the Field Name dropdown you would be able to see the DemoCustomAttributeTwo field which you can add on your lookup control.
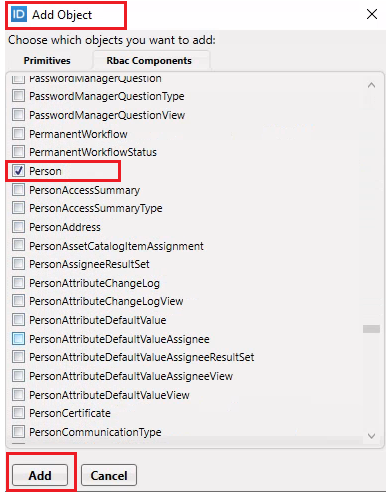
Create a Forms Control to verify the availability of our attributes in the 'Person' component.
- Create a Form. Navigate to Form Commands menu and click on Add Object.
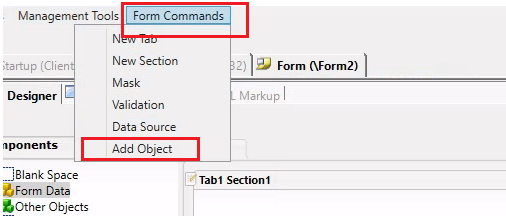
- Click on the Rbac Components tab in the Add Object dialog box. Select Person and click the Add buttons.
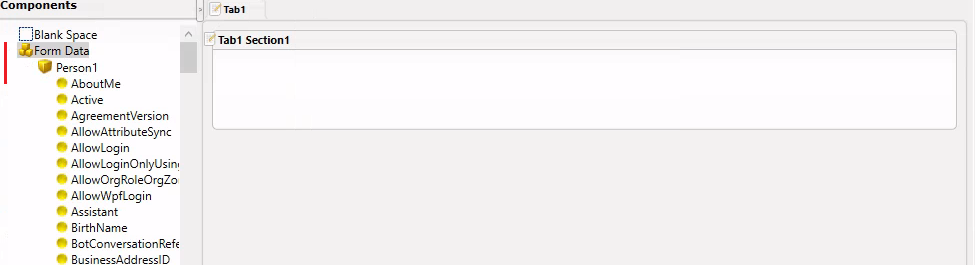
- Expand the Person1 under the Form Data scroll down and look for the attributes that we have created. Now can use these attributes on your Form. (Refer to the documentation for the Forms)

So, in this lesson, we have learned how we can extend EmpowerID components. We have explored adding new attributes and methods. Similarly, we can override existing methods.
Here is the sample code to override an existing method named Initialize.
    public override void Initialize(Account account, int? PrimaryOrgRoleOrgZoneID, string Password)
        {
            base.Initialize(account, PrimaryOrgRoleOrgZoneID, Password);
        }
Below is the picture of Visual Studio’s Solution Explorer that I used as part of this demonstration. Just for reference only.
